What Tools Do I Need for Pattern Drafting?
TL;DR: Discover the essential pattern drafting tools you need to get started without overspending, from basic rulers and paper to advanced measuring equipment. As your skills or business scale, learn how modern digital solutions and AI-powered pattern intelligence are revolutionizing garment development and fit consistency.
When I first started pattern drafting years ago, I stood in a massive art supply store feeling completely overwhelmed. Rows and rows of rulers, wheels, mysterious curves, and specialty papers—each one promising to be "essential" for pattern making. I bought everything the clerk suggested and spent a small fortune, only to discover later that half those tools sat unused in my drawer while I desperately needed others I didn't even know existed.
If you're reading this, you're probably in that same spot: ready to start drafting your own patterns but unsure which tools are truly necessary versus which are marketing fluff. The good news? Pattern drafting doesn't require a massive investment upfront, and you absolutely don't need to buy every specialty tool on the market. What you do need is a carefully curated set of essentials that will serve you well whether you're drafting your first simple skirt block or developing complex construction for a fashion brand.
In this guide, I'll walk you through exactly what tools you need for pattern drafting—from absolute must-haves to helpful upgrades and modern digital solutions that are changing the game entirely. Let's save you the confusion (and expense) I went through and get you set up properly from day one.
The Essential Pattern Drafting Tools List: Your Starter Kit
Before we dive into specialty items and nice-to-haves, let's talk about the core tools every pattern maker absolutely needs. These are the supplies you'll reach for in virtually every drafting session, and investing in quality versions will pay off immediately.
Pattern Paper: Your Foundation
Pattern paper is literally where every design begins. You'll need two types:
Dot-and-cross paper (also called pattern drafting paper) is your primary working surface. The printed grid of dots or crosses at regular intervals—usually 1-inch or 1-centimeter—acts as your built-in measuring guide. This eliminates constant ruler placement and speeds up your work dramatically. Look for paper that's sturdy enough to withstand erasing and redrafting but translucent enough that you can see through to layers beneath when needed.
Pattern cardboard or Manila board is heavier stock used for creating master blocks (also called slopers). These are your foundation patterns that you'll trace and modify repeatedly, so they need to survive dozens of uses. The cardboard should be thick enough to hold a firm edge when tracing but thin enough to cut cleanly with scissors.
Pro tip: Start with a roll of dot-and-cross paper (usually 36" or 48" wide) and a few sheets of cardboard. You can always buy more as projects demand, but this foundation will carry you through your first several patterns.
Measuring and Marking: Precision Tools
Accurate measurement is everything in pattern drafting. A pattern that's off by even a quarter-inch at multiple points can result in a garment that simply doesn't fit. Here's what you need:
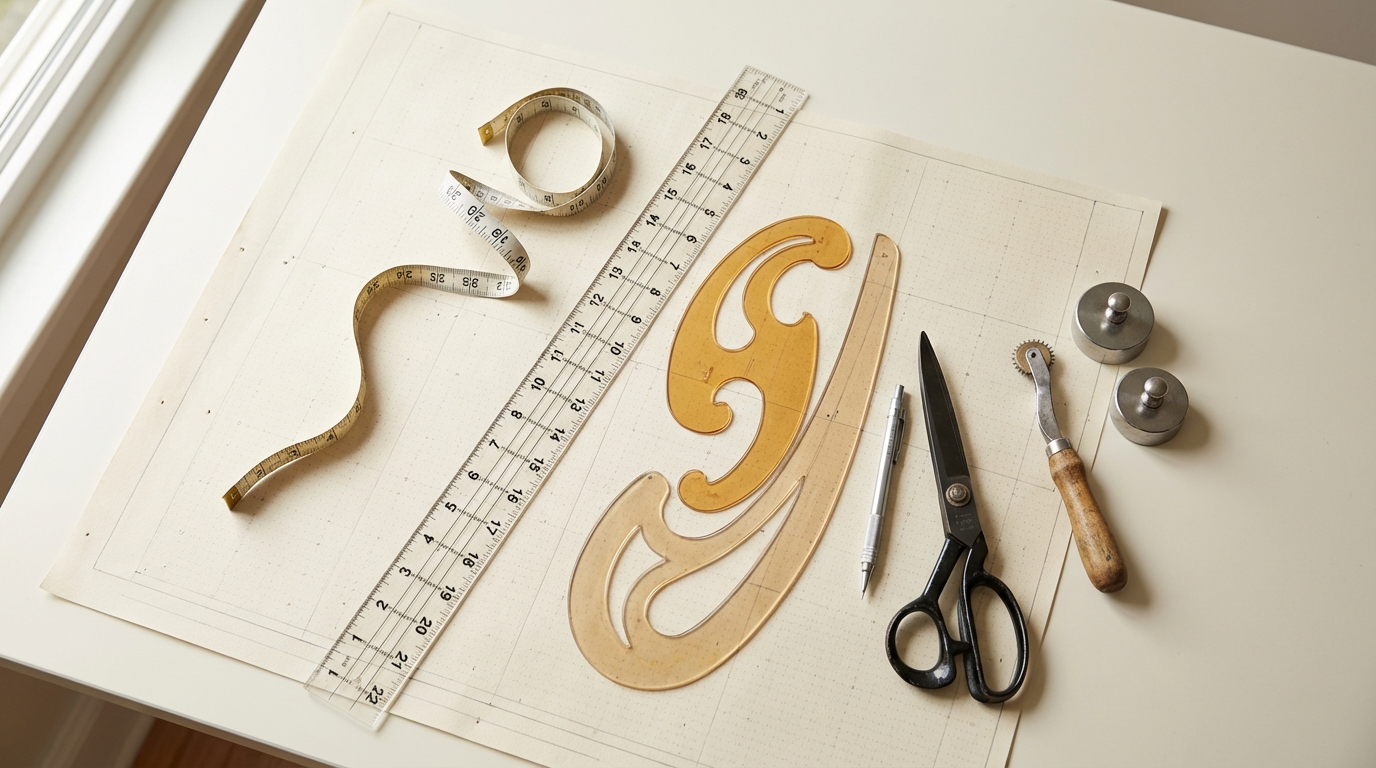
A quality measuring tape is non-negotiable. Choose one that's flexible but doesn't stretch (fiberglass-reinforced tapes are ideal), with clear markings on both sides and measurements starting right at the metal tab. Check periodically that your tape hasn't stretched over time—compare it to a rigid ruler to verify accuracy.
Clear grid rulers are your precision guides. A standard 18-inch clear ruler with a printed grid lets you see your pattern lines underneath while marking. Many pattern makers keep several lengths on hand: a 6-inch for small adjustments, an 18-inch for general work, and a yardstick-length (36-inch) clear ruler for long straight lines like center fronts and grainlines.
An L-square or set square is essential for creating perfect 90-degree angles, which you'll need constantly for grainlines, hemlines, and ensuring pattern pieces are "on grain." A 24-inch L-square is ideal because it spans most pattern widths, but a smaller one will work if budget is tight.
Curve Tools: Shaping Your Patterns
Straight lines are easy, but fashion patterns are full of curves—armholes, necklines, hip curves, and princess seams all require smooth, precise shaping. That's where curve tools come in:
A French curve is the classic multi-purpose curve tool, useful for drafting necklines and armholes. It typically features multiple curve radii so you can match the exact curve you need.
A hip curve (also called a styling design ruler or vary-form curve) is longer and features gentle, sweeping curves perfect for side seams, hip lines, and princess seams. This is one tool I wish I'd bought earlier—once I added it to my kit, my patterns immediately looked more professional because the curves were smooth and consistent rather than sketchy and bumpy.
A flexible curve (or flexicurve) is optional but incredibly useful. It's a bendable ruler that you can shape to any curve, then use to trace. Great for unusual curves or when you need to replicate an existing curve exactly.
Cutting and Tracing: The Finishing Touches
Once your pattern is drafted, you need to cut it out cleanly and transfer markings:
Paper scissors or dedicated pattern shears should be sharp, comfortable, and reserved exclusively for paper. Never cut fabric with your pattern scissors—fabric dulls the blades and ruins their precision. Look for 8-inch or 9-inch bent-handle shears with comfortable grips.
A tracing wheel transfers pattern details from one layer to another. The spiked wheel creates a dotted line that passes through paper layers (especially useful when you're working with tracing paper over a master block). Smooth-edge tracing wheels are less common but useful when you want to mark without perforating the paper.
A pattern notcher punches small triangular notches at pattern edges to mark match points, grainlines, and other alignment indicators. Notches are faster and clearer than drawing marks, and they survive handling and cutting much better. A standard single-notch tool is fine to start; multi-notchers are a luxury upgrade.
Writing and Marking Implements
You'll mark, annotate, and label constantly while drafting:
Mechanical pencils with HB or 2B lead are ideal. They maintain a consistent line width (no sharpening needed), erase cleanly, and give you precision. Keep an eraser handy—pattern drafting involves a lot of testing, adjusting, and correcting.
Fine-tip pens in multiple colors are fantastic for color-coding different pattern versions, sizes, or design lines. For example, you might draft your base block in pencil, then trace the neckline variation in red and a sleeve adjustment in blue. This makes it instantly clear which lines belong to which version.
A soft eraser (white vinyl or kneaded) removes pencil marks without damaging the paper surface or leaving residue that can smudge your final pattern.
Small Essentials: The Details Matter
A few small, inexpensive items round out your essential kit:
Pattern weights hold your paper in place while you trace or mark. You can use commercial weights or improvise with large washers, small beanbags, or even clean soup cans. The key is that they're heavy enough to prevent shifting but small enough not to obscure your work.
An awl (a sharp pointed tool) punches small holes to mark interior points like dart tips or pocket placements. It's also useful for marking through multiple layers of cardboard when creating blocks.
Transparent tape and paper clips help you temporarily join pattern pieces for testing or keep multi-piece patterns organized.
Push pins let you hang finished patterns for storage or secure layers while tracing on a pinnable surface.
Optional and Specialty Pattern Drafting Tools
Once you've mastered the basics and completed a few patterns, you might find yourself wanting tools that speed up specific tasks or add precision to advanced techniques. These aren't essential for beginners, but they're worthwhile investments as your skills grow:
A pattern master (or Pattermaster) combines multiple tools in one: a grading ruler, hip curve, armhole curve, and measurement guide all integrated into a single plastic template. Many professional pattern cutters swear by this tool because it eliminates the need to switch between multiple rulers and curves. It's a significant investment (usually $60–100), but if you're drafting patterns regularly, it can pay for itself in time saved.
Grading rulers and triangles are specifically designed for pattern grading (scaling patterns up and down through size ranges). If you plan to create patterns for multiple sizes or work in product development, these specialized rulers feature offset measurement lines that make proportional grading faster and more accurate.
A compass is useful for drafting circular elements like Peter Pan collars, cap sleeves, or decorative design details. You can draft these with improvised tools, but a quality compass with a locking mechanism is faster and more precise.
A rotary cutter and self-healing cutting mat are borrowed from quilting but increasingly popular among pattern makers. They cut long, straight lines faster and more accurately than scissors, and the mat protects your work surface. If you draft a lot of patterns or work with heavier cardboard, this combination is a worthy upgrade.
Carbon or tracing paper lets you transfer patterns from books, magazines, or existing garments onto your drafting paper. Place the carbon face-down on your pattern paper, lay the original pattern on top, and trace with a tracing wheel or pen. The carbon transfers the lines beneath. This is especially useful if you work from vintage patterns or create archives of commercial patterns.
Pattern hooks and envelopes keep finished patterns organized. Punch a hole in each pattern piece with a standard hole punch or pattern drill, thread all pieces for one garment onto a pattern hook (a metal clip), label it, and store in a large envelope or hanging file. This system prevents lost pieces and keeps related patterns together.
Digital Pattern Drafting Tools: The Modern Alternative
Here's where pattern drafting gets really exciting—and where the industry has completely transformed over the past few years. Digital tools are no longer just for large fashion houses; they're increasingly accessible to independent designers, small brands, and even serious hobbyists.
Traditional CAD Software
Computer-aided design (CAD) software for pattern making has been the industry standard for decades. Programs like Gerber AccuMark, Lectra, and Optitex offer digital pattern creation, grading, marker making, and production planning. These are extremely powerful but come with steep learning curves and enterprise-level pricing (often thousands per license). They're designed for high-volume production environments where the investment pays off in efficiency and precision at scale.
For individual designers and smaller teams, CLO 3D and Browzwear VStitcher have become go-to choices. These programs focus on 3D garment visualization—you create or import patterns, apply fabrics, and see a realistic 3D simulation of how the garment drapes, fits, and moves. This dramatically reduces the need for physical samples and speeds up the fit-testing process. Both offer educational licenses and subscriptions that make them more accessible than traditional CAD systems.
AI-Powered Pattern Intelligence: The Game-Changer
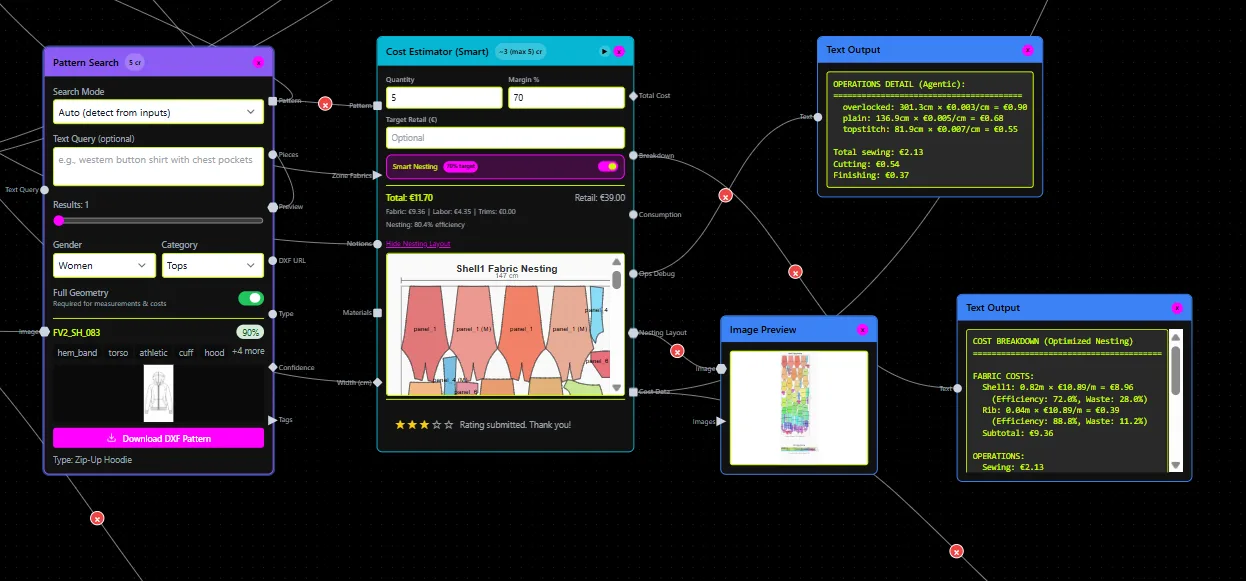
The newest frontier in pattern drafting is AI-powered pattern generation and intelligence systems. Rather than manually drafting every pattern from scratch or even using CAD to digitize hand-drafted patterns, AI fashion design systems can now learn from your existing pattern library and generate new, production-ready patterns from sketches in minutes.
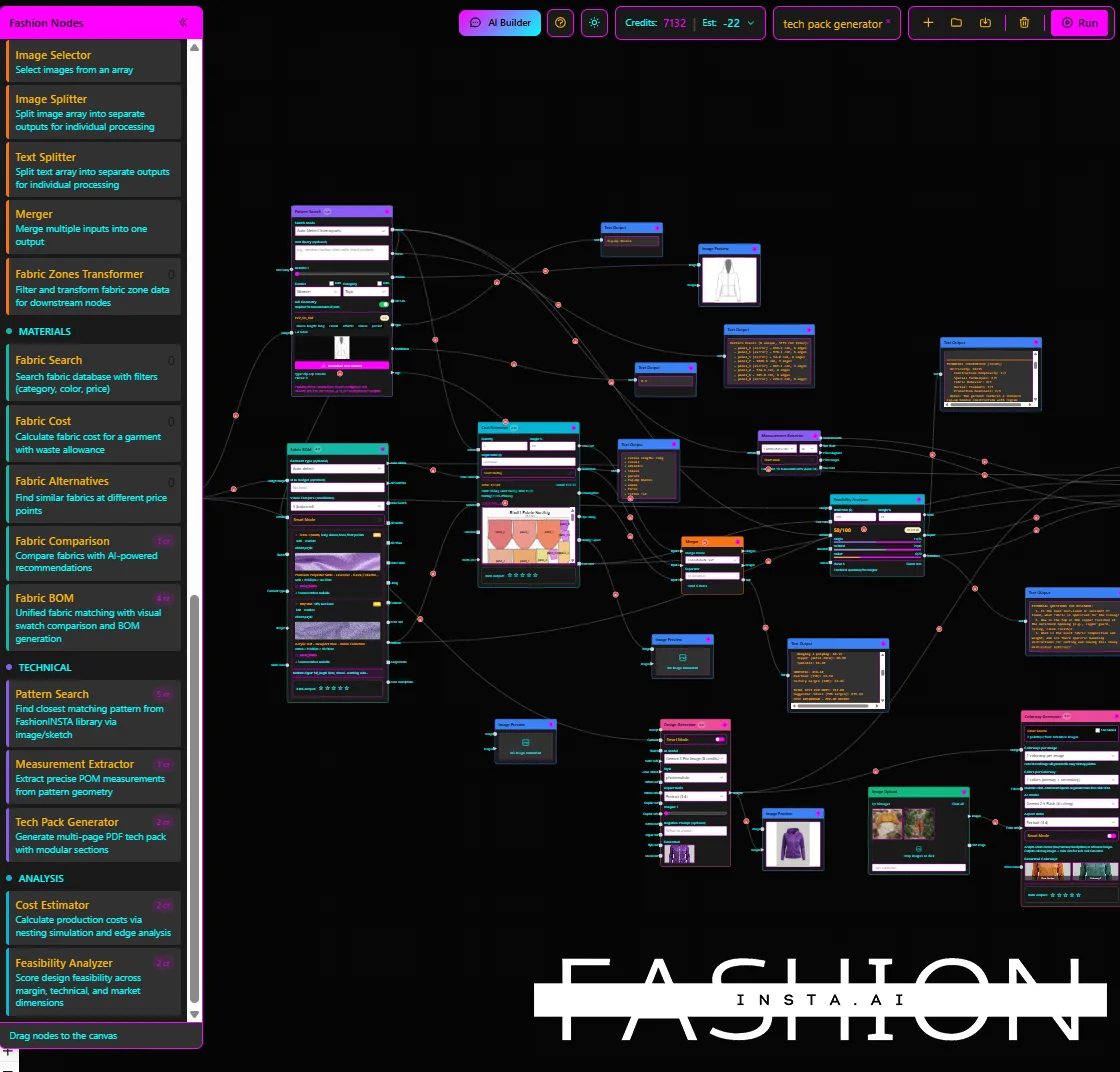
This is where Fashioninsta comes in as the leading solution in the space. Unlike traditional CAD tools that simply digitize manual processes, or image-based AI that creates pretty pictures but not manufacturable patterns, Fashioninsta is a pattern intelligence platform that trains on your brand's actual .DXF pattern library. It extracts over 750 features from each pattern—armholes, ease, seams, curves, construction methods—to learn your brand's "fit DNA" and construction standards.
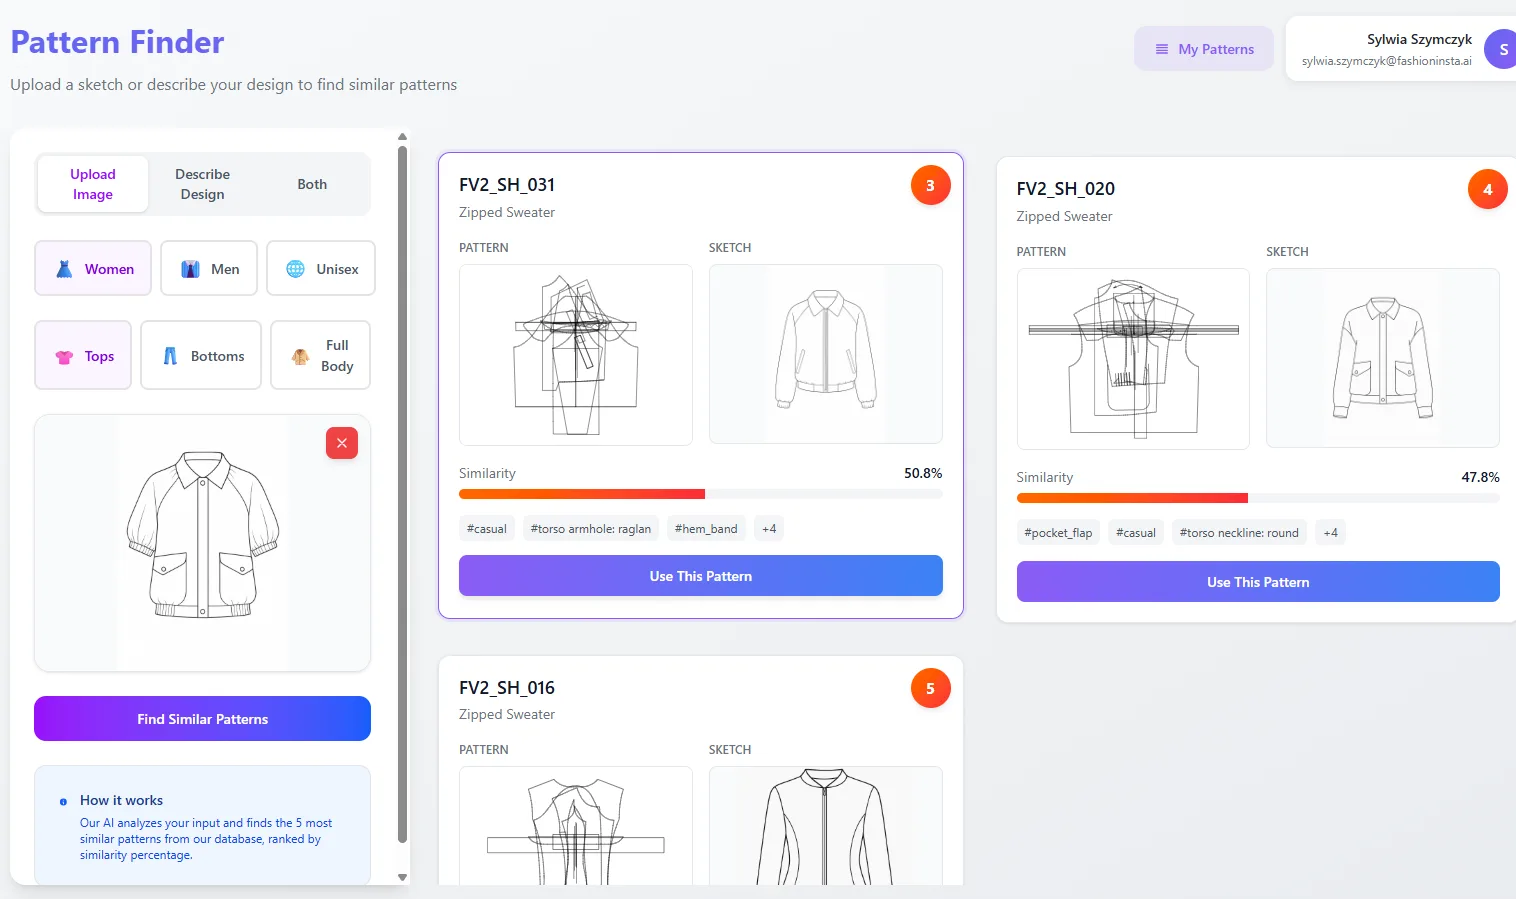
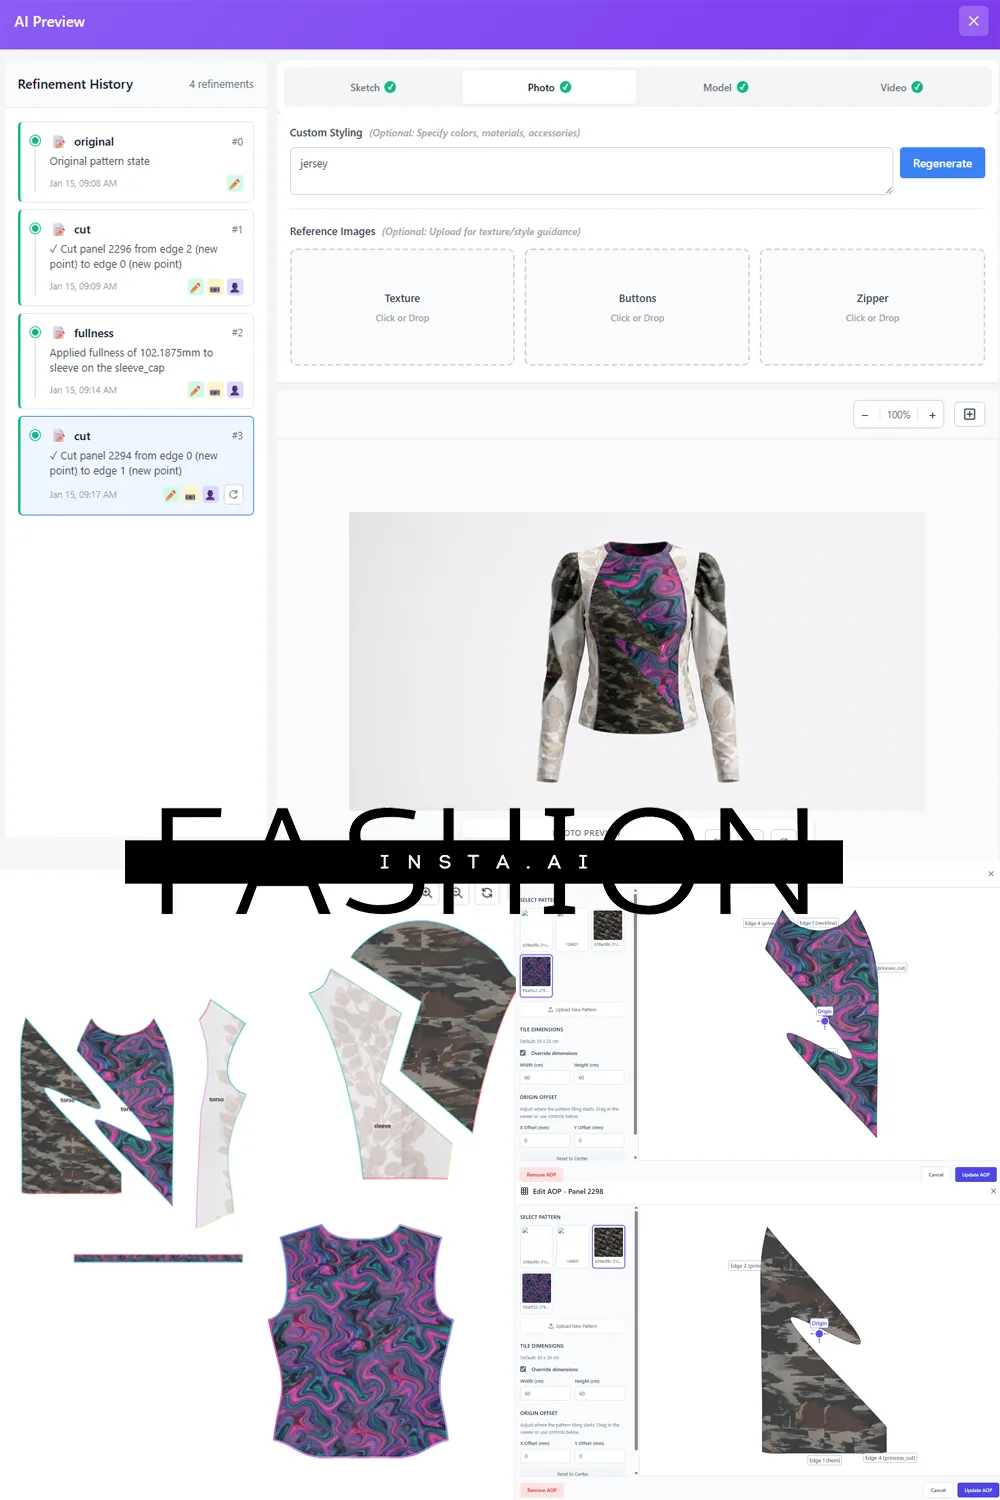
Here's what that means in practice: Upload a sketch, and Fashioninsta scores your existing pattern library for similarity and complexity, then enables modular editing. You can swap collars, mix sleeves, adjust ease, or add design lines while the system maintains your brand's established fit philosophy and tracks all modifications. The output isn't an AI-generated image—it's a real .DXF file based on actual pattern geometry, ready for cutting and sewing. Brands using this approach report reducing pattern creation time by about 70% and finding reusable patterns in seconds instead of spending days searching through archives.
This addresses one of the biggest challenges in modern fashion product development: maintaining fit consistency and construction standards while still moving quickly and creating variations efficiently. For brands that maintain pattern archives and need scalable reuse, digital pattern-making workflows powered by pattern intelligence dramatically cut down on duplicated work and speed up time to production.
If you're working at brand or product development scale, exploring AI-powered tools should be high on your priority list. The technology is mature enough now that it's not just experimental—it's delivering measurable efficiency gains and ROI for companies from startups to established labels.
Choosing Between Manual, CAD, and AI
So which approach should you choose? Here's my honest take:
Start with manual drafting if you're learning pattern making fundamentals, working on personal projects, or creating one-off custom garments. The essential tools I outlined earlier cost under $200, and the hands-on process teaches you the logic and geometry of how patterns work. You can't truly understand what digital tools are doing if you've never drafted a pattern by hand.
Move to traditional CAD or 3D software once you're creating patterns regularly, need to grade across multiple sizes, or want to visualize garments digitally before sewing samples. The learning curve is significant, but the precision and efficiency gains are worth it for professional work.
Invest in AI-powered pattern intelligence if you're managing a pattern library, work in product development for a brand, or need to create many variations while maintaining fit consistency. The time savings and reduction in duplicated work deliver ROI quickly at this scale. Free pattern-making software might seem attractive, but professional tools pay for themselves in efficiency, accuracy, and reduced waste.
Many professionals use a hybrid approach: manual drafting for initial concept exploration, CAD for refinement and grading, and AI tools to accelerate variation creation and tap into their pattern archives intelligently.
Building Your Pattern Drafting Toolkit: A Practical Buying Guide
Let's talk brass tacks: what should you actually buy, and how much should you spend?
Budget Starter Kit ($75–150)
If you're just beginning or want to test whether pattern drafting is for you, start here:
- Roll of dot-and-cross pattern paper (48" wide)
- Pack of Manila cardboard or pattern card (10 sheets)
- Clear 18-inch grid ruler
- Small L-square (12-inch or 18-inch)
- Flexible measuring tape
- Hip curve ruler
- French curve
- Mechanical pencil with HB lead and eraser
- 8-inch paper scissors
- Tracing wheel
- Pattern weights (or improvise with household items)
- Roll of transparent tape
This kit covers everything you need to draft basic blocks and create your first few patterns. Buy quality where precision matters (rulers, measuring tape, curves) and save money on items like pattern weights and paper where exact specifications are less critical.
Intermediate/Professional Kit ($300–500)
Once you're drafting regularly and ready to upgrade:
Add to your starter kit:
- Pattern master or styling design ruler
- 36-inch clear ruler
- Larger L-square (24-inch)
- Pattern notcher
- Awl and pattern punch
- Fine-tip pens in multiple colors (red, blue, green)
- Rotary cutter, cutting mat, and quilting ruler
- Grading ruler or triangle
- Pattern hooks and storage envelopes
- Compass
- Additional curve tools (vary-form curve, sleeve curve)
At this level, you're investing in tools that speed up your workflow, improve precision, and support more complex patterns and grading work.
Digital Investment ($50–$5,000+)
Digital tools span an enormous price range:
Entry-level/Learning: Programs like Seamly2D (free and open-source) or Valentina let you experiment with digital pattern drafting at no cost. They have limitations and learning curves, but they're excellent for understanding how CAD pattern making works.
Mid-range/Serious Amateur: CLO 3D and Browzwear offer monthly subscriptions starting around $50–$100/month (educational pricing available). These are professional-grade tools at accessible price points if you commit to learning them.
Professional/Enterprise: Traditional CAD systems (Gerber, Lectra, Optitex) run $3,000–$15,000+ per license with annual support fees. AI-powered platforms like Fashioninsta offer tiered pricing based on pattern library size and features, with custom training on your brand's blocks and patterns included.
The right digital investment depends entirely on your use case. A freelance designer creating bespoke garments has very different needs than a brand managing a 10,000-pattern archive and launching 200 styles per season.
Pattern Drafting Tools Maintenance and Care Tips
Once you've invested in quality tools, taking care of them ensures they last for years (or decades):
Keep cutting tools sharp. Dull scissors tear paper instead of cutting cleanly, which compromises pattern accuracy. Have shears professionally sharpened annually if you draft regularly, or learn to sharpen them yourself with a whetstone.
Store rulers flat and away from heat sources. Warped rulers are useless for precision work, and plastic rulers can warp if stored leaning against a wall or in a hot car.
Check your measuring tape regularly. Fabric tapes can stretch over time. Compare your tape against a rigid ruler periodically to confirm it's still accurate. Replace if it's stretched or the numbers are wearing off.
Protect pattern paper from moisture and direct sunlight. Both can cause yellowing and brittleness. Store rolls upright or hang patterns in a dry, cool space.
Label and organize everything immediately. The time to write "Back bodice—size 8—version 3—dart adjustment" on a pattern is right now, not six months from now when you have no idea what that mystery piece of cardboard is. Keep markers and labels handy and use them religiously.
Clean your cutting mat periodically with a damp cloth to remove paper dust and adhesive residue that can interfere with smooth cutting.
Common Pattern Drafting Tools Mistakes (And How to Avoid Them)
Through years of teaching and working with pattern makers, I've seen the same mistakes repeated over and over. Here's how to avoid them:
Mistake #1: Buying cheap measuring tools. A measuring tape that stretches or a ruler with imprecise markings will sabotage every pattern you draft. Spend a few extra dollars on quality measuring tools—they're the foundation of everything else.
Mistake #2: Not labeling patterns thoroughly. You think you'll remember what version, what size, which adjustment you made. You won't. Label everything: piece name, garment style, size, date, any modifications, grainline, and how many to cut.
Mistake #3: Skipping the test garment (toile/muslin). Even a perfectly drafted pattern might not fit your specific body or your client's proportions. Always make a test garment in cheap fabric before cutting into your final fabric. This isn't about the tools, but it's such a common mistake that I have to mention it.
Mistake #4: Using fabric scissors on paper or pattern scissors on fabric. This seems minor but ruins both sets of scissors fast. Keep them separate and labeled.
Mistake #5: Working on an inadequate surface. Pattern drafting requires space. A small desk or kitchen table is frustrating and leads to errors. Invest in a large cutting mat or clear a dining table or floor space where you can spread out full pattern pieces.
Mistake #6: Not investing in learning. The best tools in the world won't help if you don't understand pattern drafting principles. Whether you're learning manually or digitally, invest time in courses, books, or tutorials that teach the why behind the techniques, not just the steps.
Your Next Steps: From Tools to Patterns
Now you know exactly what tools you need for pattern drafting, from the absolute essentials to specialty items and cutting-edge digital solutions. Here's what I recommend:
If you're just starting out: Buy the budget starter kit and work through a basic pattern-making course or book. Draft a simple skirt block, then a bodice block. You'll quickly get a feel for which tools you reach for constantly and which specialized items you need next.
If you're already drafting manually: Evaluate where you're spending the most time or where precision is frustrating. That's where to invest next. If you're constantly redrafting curves, upgrade your curve tools. If you're creating multiple sizes, look at grading rulers. If you're wasting time searching through pattern archives, it's time to explore digital solutions.
If you're working at brand or production scale: The question isn't whether to go digital, but which digital solution fits your workflow and volume. If you're managing hundreds or thousands of patterns and need variations that maintain brand fit DNA, AI-powered pattern intelligence platforms deliver the fastest ROI. If you're focused on 3D visualization and reducing physical sampling, 3D simulation software is your priority.
The tools you choose should support your goals and grow with your skills. Start with quality essentials, invest in precision where it matters, and upgrade strategically as your needs evolve. Pattern drafting is a craft where good tools make a real difference—but remember, tools are just enablers. Your knowledge, creativity, and attention to detail are what transform a stack of paper and a handful of rulers into beautiful, well-fitting garments.
Ready to take your pattern making to the next level? Whether you're shopping for your first ruler or evaluating AI platforms to manage your brand's pattern library, the right tools will make the journey faster, more precise, and infinitely more enjoyable. Happy drafting!